100-Day Game Dev Blog Challenge #4 Sprite Sheets
Learning little by little: Sprite Sheets
I felt like I didn’t accomplish enough yesterday to warrant a blog post on my progress, but today was great. I finally figured how to make my own sprite sheets using an art application and then transfer it into Unity and edit it futher in detail. Sprite sheets are a collection of images that show how a particular item, character or object in a game has changed. For example you might have a door that is closed, slightly open, and completely open. Three stages of a door represented by three different images. Sprite sheets can be useful for setting still images on your level or if you wanted to make a quick animation. I’m taking a Udemy course to help me get the fundamentals of Unity and I’m enjoying it, but as I saw yesterday, sometimes progress can be slow.
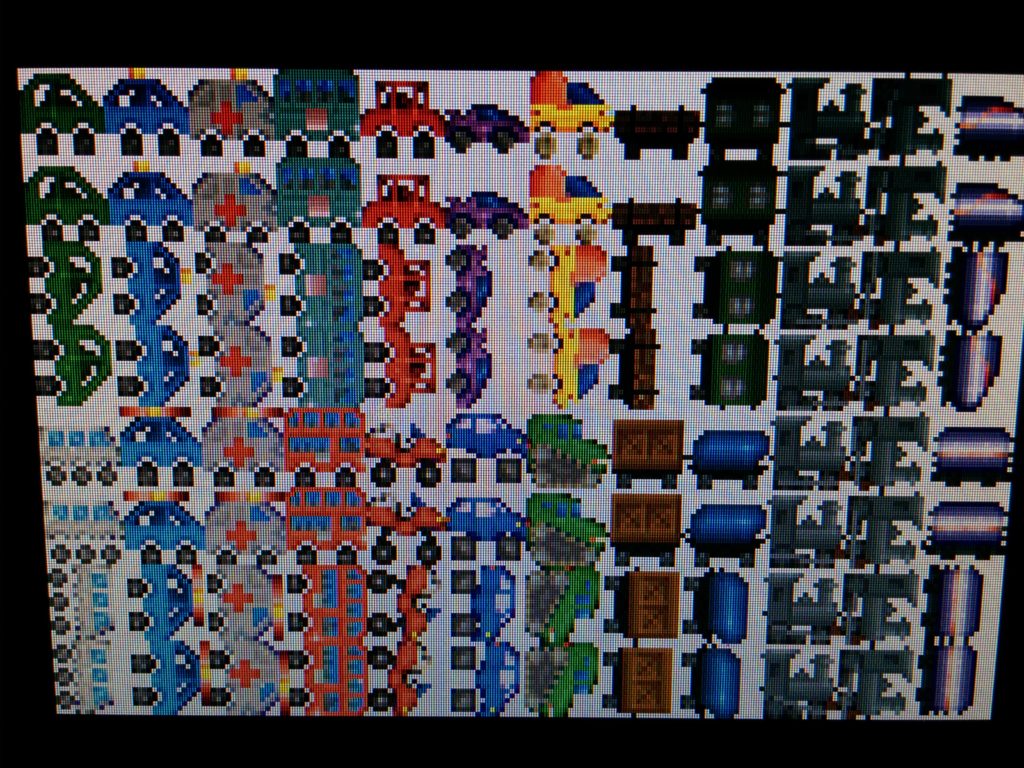
Sample sprite sheet of vechicles
What Happened
Yesterday I was trying to import multiple sprites at a time into Unity… I struggled. This was a real struggle fest in that my images would appear in Unity, but for some reason Unity believed my collection of images was one big image. I didn’t realize it until I watched my class lecture multiple times. Apparently the distance between my sprites designated by transparent space wasn’t large enough for Unity to register multiple images. Once I figured out how to add any type of sprite from my sprite sheet into a game, I realized I could save so much time. Now something that took more than an hour to understand, will now just take me 10 minutes. The sprite sheet below will show you what I mean by having transparent space between images in your sprite sheet. If the transparent space isn’t big enough, Unity will think you’re inserting a large picture. Note: These images do not represent the final product for my first game, they were just used for a test run to understand the concept. These are bricks that show damage over time. I am not using these in my final game since I borrowed the top sprite from my course for practice. The bottom three images were created by me.
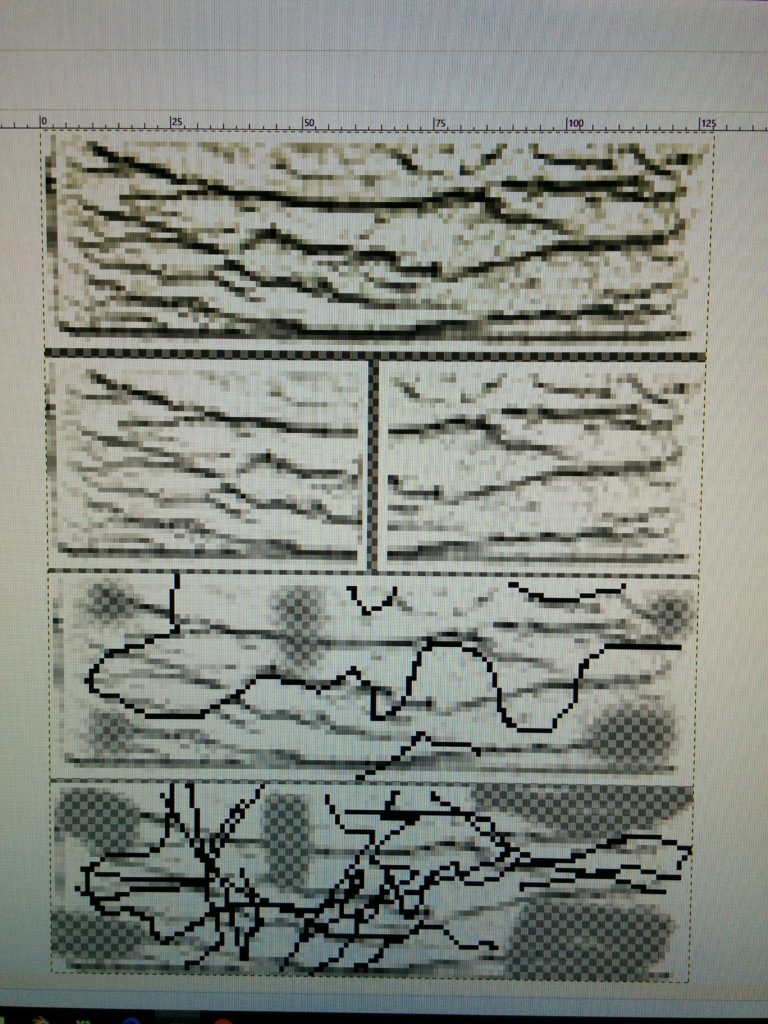
Learning how to use a Sprite Sheet in Unity: Remember transparency is key.
As I keep proceeding with game development, I know I will encounter more road blocks along the way, but I’ll keep on trucking. This Tuesday I’m hoping to show off a draft one of my levels for the game with a completed Jason brick model that reacts to hits. Let’s see if I can pull it off.
100-Day Game Dev Blog Challenge Day #3 Frustrations and Collisions
The road ahead is like a marathon
Today’s post while short, might be interesting to you if you’re wondering about the bread and butter behind an Arkanoid game, collisions. I’ve been a little sick today so I mainly focused on playing my game in its current state and coming up with a laundry list of things to add. Some of these items possibly include: powerups, moving blocks, blocks that change tone or image after they have been hit, music, and sound effects etc. There is only so much you can do with an Arkanoid game / clone, and yet to me it feels like a mountain. I’ll be honest I’m taking courses and looking at guides to help me with the foundation of building my first mini game. Although I’m shooting for a small size, seeing what I have to learn to accomplish all of this, move on to the next game, and eventually get enough skills so I can one day in the future make a game to sell is a little overwhelming. A comparison might be, an extremely overweight person who is trying to train for a marathon and complete it in qualifying or record time, even though they have never run a 3k race before in their life.
So to keep up my spirits and move on, I celebrate the small victories. No matter how trivial, no matter how long it took to do one thing, like get the blocks to destroy on collision. Or yesterday’s problem: struggling for an hour wondering why your sprites weren’t rendering properly and coming out in different shades whenever you played it. The answer was because the depth or Z-Depth of the sprites and my background was the same, so my background image would impact which sprites would change color whenever I moved them. (Do’h!)
Collisions Make an Arkanoid
Today’s small victory was finally implementing the code to break the blocks in my game. The code looks like this inside my brick sprite and i’ll explain it as best I can. Keep in mind this is only a small piece of a much larger part of code, so some parts are missing.
void Start ( )
{
timesHit = 0;
}
void CollisionEnter2D (Collision2D col)
{
timesHit++;
if (timesHit >= maxHits)
{
Destroy (gameObject);
}
}
So you might be wondering what is this mumbo jumbo above. This is likely the most important code in Arkanoid that really makes the game. It is located in my brick script attached all bricks I insert in the game. We have the start function where we have an integer called timesHit that is set to 0. Next we have another method or function titled CollisionEnter2D. This is where the game senses that a collision has taken place between two objects.
In the method CollisionEnter2D you have an argument called Collision2D and a variable called col (not the most important in what I’m explaining, so don’t worry about it). Inside the method you have the integer timesHit increasing by 1 every time a collision is detected. Then we have an if statement where when the #of timesHit is greater than or equal to maxHits another integer, the object will destroy itself. The gameObject being the current sprite containing the brick script.
What’s cool about this code?
What’s nice about this code is that it will apply to all objects you’ve included in your game that contain this script. So instead of editing each individual object’s code, I just have to edit the script and it is applied to all objects that share the script. Pretty cool!
Day 2 – 100 Day Game Dev Blogging Challenge: Building Giant Monsters and Colliders
Building a Giant Jason
Today was a challenging but fun day since I got to build giant monsters for Horror Block Breaker. I know. The name is cheesy, and it needs to change. I’m still coming up with a name, so hopefully I can write it proudly here on the blog.
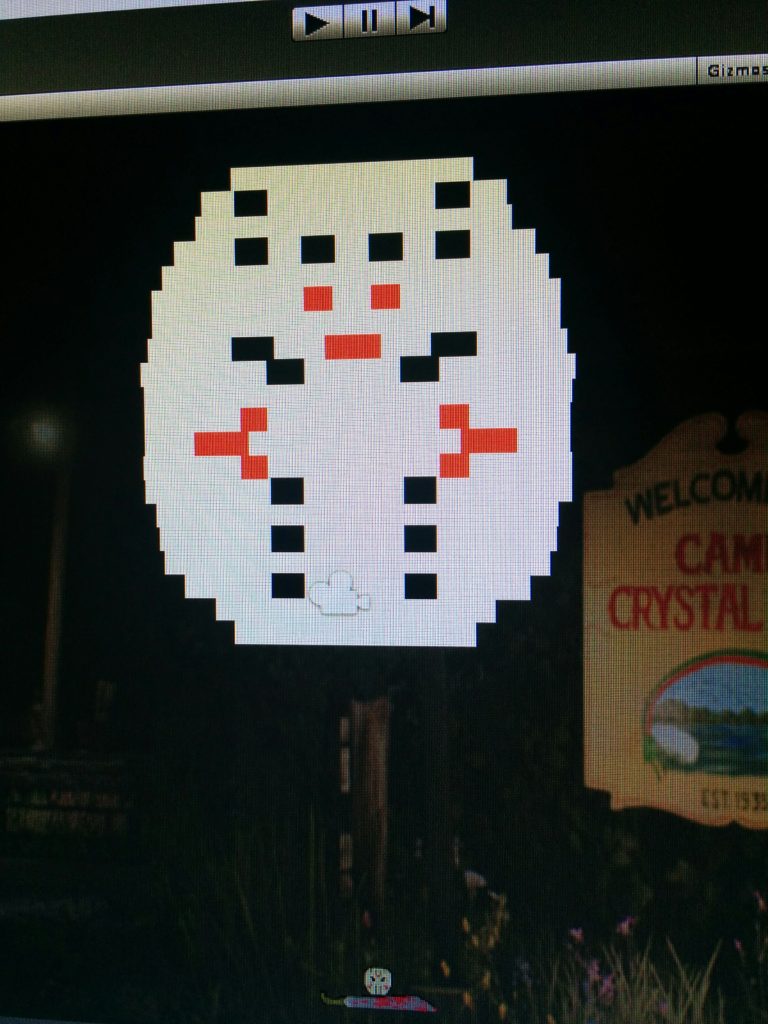
When it comes to Arkanoid, most versions have blocks of about the same size in each level. The challenge this poses for building my Jason level is that Jason’s mask has several details. For example, eye slits, tiny mouth holes, red markings, and discoloring (depending on the film). Thankfully Unity allows me to change the size of a block individually when I place it on the game space. Though time consuming, I can adjust each block until I get a relatively close shape resembling Jason’s mask.
The picture below is my first attempt at making Jason inside the Friday The 13th level. Arranging the blocks was difficult, but by placing the black and red blocks first and then the white, I was able to get an okay start. What’s cool about Unity is that it reminds me of a lot of features you’d see in a picture editor like Gimp, Photoshop, or PicMonkey. You have the option to put your sprites in layers so if you want to have objects overlapping each other, it’s pretty easy. The layers feature allowed me to place the longer white blocks in the background of the red and black so I’d have better control with the outline without covering the red and black blocks from view. I plan to decrease the size of the mask by around 30-50% and add a body and a weapon.
A Simple Explanation of Colliders in Unity
Colliders are a component in Unity that are attached to game objects in order to have collisions for 2D games (possibly 3D as well, though I’ve yet to make a 3D game). For example let’s look at the classic game Asteroids. You’re flying around in your little spacecraft (triangle-shaped) and suddenly an asteroid hits you and you blow up into several pieces. In order for that to happen, there needed to be a collider placed around your ship and a collider around the asteroid. The colliders sense when a collision takes place through their physics and rigid bodies. The game objects then react according to the settings you’ve selected for gravity, velocity, or even a special script you may have written via code.

Usefulness of Colliders in Horror Block Breaker
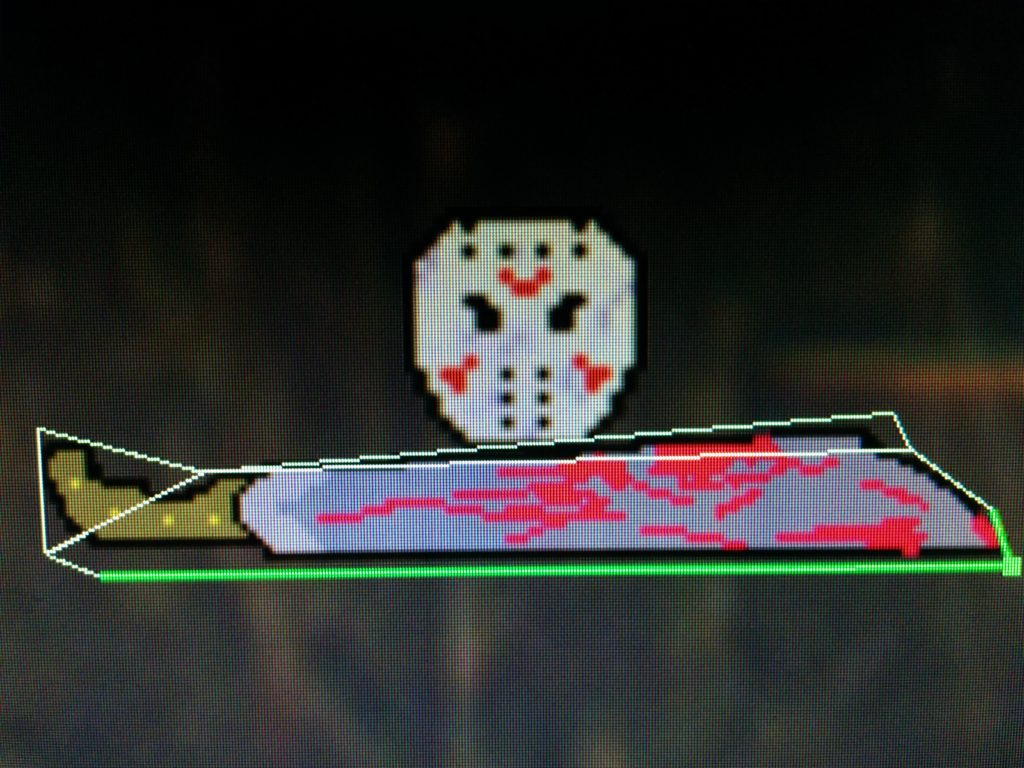
What’s useful about colliders is their different shapes such as circles, squares, and other polygons. You could use a collider to directly cover your sprite or perhaps establish an invisible perimeter in your game. For Horror Block Breaker I use three colliders to establish the boundary of my game and some special colliders for the machete. Strange however was how the colliders on the machete became a combination of triangles. It reminded me of the time I tried the Oculus Rift in Japan. The triangles created a perimeter which represented the boundary for the VR game I was playing. But depending on your object, a direct collider may not be the best option. Direct colliders can cause errors and sometimes impact performance of the game (at least in Game Maker Studio). So far I’ve enjoyed using colliders in my game, but we’ll see what happens.
For my next post I’m going to try and write some code and explain it so I can better solidify my understanding of C# and maybe show you something interesting and new things in game development.
See you all tomorrow everyone!
100-Day Game Dev Blogging Challenge: Enter Horror Block Breaker
100-day Game Dev Blogging Challenge
Hello Internet! Today marks the first day of my 100-day Game Dev Blogging Challenge. I was inspired to do this after watching the recent Friday The 13th panel at PAX West on “How to Market a Game and Run Your Own Kickstarter. After giving it some thought, I realized I can improve when it comes to posting and sharing my progress instead of being secretive about it.
What are the goals for this challenge? I’d like to post daily updates (shoot for 100 and push on) on what I’ve accomplished on my game development journey and develop good posting habits. In the process, I will provide some games for people to enjoy who are reading my blog and following me on YouTube and various social media platforms.
So far I’ve made a couple of text games which have provided me some fundamentals on how to use Unity. I chose Unity over Unreal due to the community in Boston surrounding the game engine. I’ve also had several opportunities to take on consulting work if I were proficient in using and teaching the engine. I would love to one day become certified in Unity and be able to teach it to various companies, schools, and organizations. I’ll be honest, I’m still a beginner and have a long ladder to climb. But I figure what better way to level up than by posting my progress, challenges, and some cool games hopefully you will enjoy. If I get good enough where I can maybe try to sell a product in the future, maybe I can do this full time for a living. That’s the dream!
Enter Horror Block Breaker
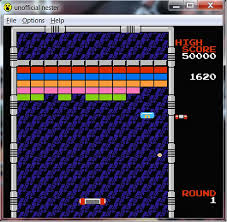
I’ve made some text games to help familiarize myself with Unity, but the first game I’ve making with the hopes of showing to the world and getting feedback is a free challenge version of “Arkanoid” or “Block Breaker.” For those who may not know, Arkanoid is a classic game where you launch a ball towards a bunch of blocks and try to destroy the blocks by hitting the ball back. To make my version of the game unique and cater to horror fans, I’m changing the paddle and the formation of the blocks.
Crazy Paddles and Horrific Block Formations
Your typical Arkanoid paddle consists of a block and maybe two right angle triangles to help bounce the ball to the sides. To add a little more personality, I decided to alter the paddle for each level by making it into a weapon or item found in a particular horror film. For example the Friday The 13th level has a bloody machete for the paddle and Nightmare on Elm Street has Freddy’s hat for a paddle.
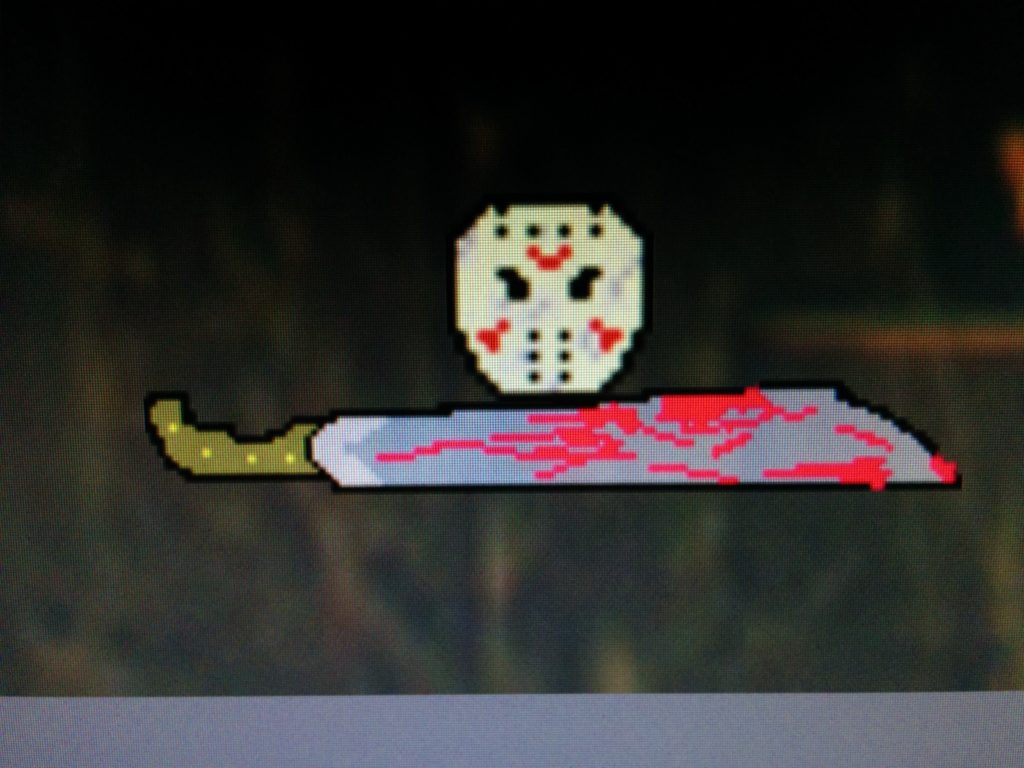
Since I’m using a particular item instead of a traditional square, I can experiment with Unity’s colliders so the ball might go slightly to the right or curve when you hit the handle of the machete and veer off in a different direction if you hit the angled blade. The trick to win in this game is not simply move the paddle and hit the block, but understand how each paddle works after using it and perhaps dying once or twice.
The second way I’m making this game unique, but also a bit more of a challenge is to arrange the blocks in a particular shape. On the Friday The 13th level you’ll have to destroy a full bodied Jason in block form or a large hockey mask. Each level will have a different paddle and a different arrangement of blocks resembling some semblance to a horror icon. I’ve got three levels in progress, but if you have a suggestion for a film I should try to add, let me know in the comments.
For my next entry I’ll discuss colliders and talk about what I’ve accomplished on the second day. Thanks for reading and ‘Stay Mad!’
Starting a new series with new challenges. Enter Batman Arkham Asylum!
This week I’m starting a new series with new challenges for my YouTube videos. I’d like to start branching out from Friday The 13th, so as I promised in the 1-year anniversary video, I have launched episode 1 of Mad-Eye Plays Crusty Old Games. Episode 1 features Batman Arkham Asylum. I took the boring parts and I tried to condense 90 minutes of footage into 12 minutes. It was difficult, but I think I managed to include the best parts. So if you like Batman and would like to see my new and developing approach to editing, check out the video and give me some feedback.
Coming Soon!
Daily Videos
Achievement Unlocked
Made my first game and launched it on the blog
Current Quest
Learn Advanced Editing Techniques

